Showing posts with label DCP. Show all posts

Saturday, November 20, 2010

Making a DCP entirely with open source tools (update)

Here I detail my most up-to-date pipeline for producing a DCP with open source tools. I have used these techniques to produce a DCP for The Incident at Tower 37 that has (to date) ingested and played properly on Doremi and Dolby servers. This technique is an updated version of the original pipeline I posted earlier this year, but with many small but important changes (mostly related to audio and proper formatting of the hard drive).

Step 0: prepare sources

My source video was a 24fps lossless QuickTime movie, RGB color, 1920 x 1080 (16:9). For the purposes of this document, call it INMOVIE.mov.

My source audio comprised of six wav files for Dolby 5.1 surround, each 48kHz mono and 24 bits per sample. This bit depth is critical! Dolby DSS servers considered the DCP corrupt until the audio sources were 24 bit.

Step 1: export PNGs from source QuickTime movie

Tool: ffmpeg
Version: SVN-r21770 (compiled locally)
Command:

ffmpeg -r 24 -i INMOVIE.mov -f image2 %08d.png
This marches through the video file outputting a lossless, compressed PNG 24 times per second.

Step 2: convert to 12 bit per channel XYZ color imagesTool: ImageMagick's convert
Version: 6.5.9 (compiled locally)
Must be run once per PNG frame.
Command:
convert FRAME.png -type TrueColor -alpha Off -depth 12 \
-gamma 0.454545 \
-recolor "0.4124564 0.3575761 0.18
04375 \
0.2126729 0.7151522 0.0721750 \
0.0193339 0.1191920 0.9503041" \
-gamma 2.6 FRAME.tif
This takes a 1920 x 1080 PNG from step 1, removes any alpha, sets the bit depth to 12 bits per pixel, and does a linear-space color shift from RGB->XYZ. Then it writes the image out as a TIFF. According to a comment I saw here, only one of the dimensions of the image need to match 2048 x 1080.

Step 3: convert TIFFs to JPEG-2000Tool: OpenJPEG's image_to_j2k
Version: 2.1.3.0(compiled locally from subversion revision 543)
Must be run once per TIFF frame.
Command:
image_to_j2k -cinema2K 24 -i FRAME.tif -o FRAME.j2c
This takes longer per frame than convert, in my experience. About 2x longer.

Step 4: make all the necessary DCP filesTool: OpenCinemaTools
Version: 1.1.2 (compiled locally)
Tool: asdcplib
Version: 1.6.37 (compiled locally)

NOTE: the next time I revisit this process I'm going to try using the new openDCP library instead of OpenCinemaTools, which is not actively supported and was quite challenging to build.

This step has five substeps, each of which generates one or more of the files needed for the DCP. Naming conventions are very important in DCP land, so I highly recommend that you read about them yourself and make informed choices. When you see DCPFULLNAME below, that's shorthand for what I used, which was the mouthful:
TOWER37_SHR_F_EN-XX_US-XX_51_2K_ST_20101105_OV
Command A (create a video MXF file from the folder of J2K files):
asdcptest -v -E -L -c PROJ.video.mxf FOLDER_OF_J2KS
Command B (create an audio MXF file from the six wavs):
asdcptest -v -l 5.1 -E -L -c PROJ.audio.mxf \
left.wav right.wav center.wav \
sub.wav surrLeft.wav surrRight.wav
Command C (create an XML composition playlist):
mkcpl --kind short --title DCPFULLNAME \
--annotation DCPFULLNAME --norating \
PROJ.video.mxf
PROJ.audio.mxf > PROJ.cpl.xml
Do check the output of command C and confirm that the durations of both video and audio are identical. The XML tag for this is "IntrinsicDuration."
Command D (create an XML packing list):

mkpkl --issuer BitFilms --annotation DCPFULLNAME \ PROJ.video.mxf PROJ.audio.mxf PROJ.cpl.xml > PROJ.pkl.xml
Command E (create the ASSETMAP and VOLINDEX XML files):
mkmap --issuer BitFilms \PROJ.video.mxf PROJ.audio.mxf PROJ.cpl.xml PROJ.pkl.xml
I used a bit of shorthand above since I did not identify enclosing folders. I suggest that if you make a DCP this way, you use temporary folders for all the inputs (and the results of steps 1-3), then create a finalDCP folder which you populate with only the files that will be part of the eventual DCP itself (namely, the 2 mxfs and the 4 XML files that come from step 4).

Step 5: get the DCP onto a Hard DriveTool: gparted
Version: 0.7.0-4 "live" CD image

I found the best guidance for this step at the Inter-Society Digital Cinema Forum website.

In short, you want an MBR partition table and an EXT3 file system. I booted gparted from the live CD and made a single partition on my portable USB hard drive. NOTE: I tried an HP SimpleSave drive and regretted it. This drive comes with an uneditable partition that mounts like a read-only CD-ROM in addition to its actual storage. My Lacie Rakiki worked great.

Once the disk is formatted, just copy over the 6 files that emerged from step 4 right to the root of the new disk. And it's done.

Some quick notes:
  • It is important that you check your XML files to make sure the file paths don't contain any incorrect information: if you aren't careful during step 4, your file paths in the XML may be incorrect! Here's what one of my entries looks like in my final ASSETMAP.xml file as an example: file:///tower37fullDCP.video.mxf
  • I don't know what happens if your audio and video durations are different, so I was careful to make sure mine were not. Check them in the CPL (the tag is ).
  • Work with a small movie file for starters, a minute or less, until you get the steps ironed out. Then move to your full film.
Good luck!

Thanks:
Wolfgang Woehl
John Hurst
Dave Samson
Bryan Dennis

Sunday, October 24, 2010

open source DCP update: need help testing

As a reader named Vincent posted in August on my open-source DCP process post, this method isn't foolproof. Last week I personally encountered the problem he described where a DCP ingests properly onto a Dolby DSS server, but then appears with a nasty red X on it saying "corrupt." This is happening with a DCP that ingests and plays just fine on a Doremi server.

For those keeping close notes, my problem was on a Dolby DSS100. Vincent's was on a DSS200. He also had a problem ingesting on what I assume was a Datasat DC20 server as well.

It is my goal to ferret out all of these problems and post the solutions here for everyone's benefit. If you have access to a server (or servers) and are willing to run some brief tests, you can help! Just let me know what kind of server(s) you can use and I'll get you access to a small DCP (< 1 Gb) that you can download and try to ingest/play.

Thanks in advance!

Friday, February 26, 2010

Making a DCP entirely with open source tools


this technique is now obsolete - try the latest method instead!


Here are the steps I followed to produce a DCP for the 11-minute short film The Incident at Tower 37. It has ingested and played properly on a Doremi DCP-2000. The projector was a Barco model. Everything below was done on a Linux machine.

Credit where it is due: as I mentioned in an earlier post, I'm building off the work of the people behind asdcplib and OpenCinemaTools, and the users on the Red user forums who have published software and instructions that they have used/created while traversing this bumpy path. Big thanks to Wolfgang, Pavel, Marc, Samson, and Josiah.

In the interest of brevity, I'm not going to explain why I chose program X over program Y -- those interested can read my previous posts where I go into more of those details. Also, I'm not trying to present the be-all, end-all DCP manual here; this is just what worked for me!

Step 0: prepare sources

My source video was a 24fps lossless QuickTime movie, 1920 x 1080 (16:9). For the purposes of this document, call it INMOVIE.mov.

My source audio comprised of six wav files for Dolby 5.1 surround, each 48kHz mono.

Step 1: export PNGs from source QuickTime movie

Tool: ffmpeg
Version: SVN-r21770 (compiled locally)
Command:

ffmpeg -r 24 -i INMOVIE.mov -f image2 %08d.png
This marches through the video file outputting a lossless, compressed PNG 24 times per second.

Step 2: convert to 12 bit per channel XYZ color images
Tool: ImageMagick's convert
Version: 6.5.9 (compiled locally)
Must be run once per PNG frame.
Command:

convert FRAME.png -type TrueColor -alpha Off \
-background black -extent 2048x1080-64 -depth 12 \
-gamma 0.454545 \
-recolor "0.4124564 0.3575761 0.18
04375 \
0.2126729 0.7151522 0.0721750 \
0.0193339 0.1191920 0.9503041" \
-gamma 2.6 FRAME.tif
This takes a 1920 x 1080 PNG from step 1, removes any alpha, pads the image with 64 pixels of black on each side so that it becomes 2048 x 1080, sets the bit depth to 12 bits per pixel, and does a linear-space color shift from RGB->XYZ. Then it writes the image out as a TIFF.

Upon further reading, I interrogated my own decision to force the 1920 x 1080 images into a 2048 x 1080 container by padding with black. Apparently, you only need one dimension of the source imagery to match either 2048 or 1080 and the OpenJPEG encoder will do the right thing.

The new conversion line I used today omits the padding and looked stellar at the theater just moments ago:
convert FRAME.png -type TrueColor -alpha Off -depth 12 \
-gamma 0.454545 \
-recolor "0.4124564 0.3575761 0.18
04375 \
0.2126729 0.7151522 0.0721750 \
0.0193339 0.1191920 0.9503041" \
-gamma 2.6 FRAME.tif
This must be run one frame at a time, but it's very easy to distribute ranges of frames to multiple processors if you have them.

Step 3: convert TIFFs to JPEG-2000
Tool: OpenJPEG's image_to_j2k
Version: 2.1.3.0(compiled locally from subversion revision 543)
Must be run once per TIFF frame.
Command:
image_to_j2k -cinema2K 24 -i FRAME.tif -o FRAME.j2c
This takes longer per frame than convert, in my experience. About 2x longer. Also easy to distribute to many machines, however.

Step 4: make all the necessary DCP files
Tools: OpenCinemaTools
Version: 1.1.2 (compiled locally)

This step has five substeps, each of which generates one or more of the files needed for the DCP. Naming conventions are very important in DCP land, so I highly recommend that you read about them yourself and make informed choices. When you see DCPFULLNAME below, that's shorthand for what I used, which was the mouthful:
TOWER37_FTR_F_EN-XX_US-XX_51_2K_ST_20100212_OV
Command A (create a video MXF file from the folder of J2K files):
asdcptest -v -L -c PROJ.video.mxf FOLDER_OF_J2KS
Command B (create an audio MXF file from the six wavs):
asdcptest -v -L -c PROJ.audio.mxf left.wav right.wav \
center.wav sub.wav surrLeft.wav surrRight.wav
Command C (create an XML composition playlist):
mkcpl --kind feature --title DCPFULLNAME \
--annotation DCPFULLNAME --norating \
PROJ.video.mxf
PROJ.audio.mxf > PROJ.cpl.xml
Do check the output of command C and confirm that the durations of both video and audio are identical. The XML tag for this is "IntrinsicDuration."
Command D (create an XML packing list):

mkpkl --issuer BitFilms --annotation DCPFULLNAME \ PROJ.video.mxf PROJ.audio.mxf PROJ.cpl.xml > PROJ.pkl.xml
Command E (create the ASSETMAP and VOLINDEX XML files):
mkmap --issuer BitFilms \PROJ.video.mxf PROJ.audio.mxf PROJ.cpl.xml PROJ.pkl.xml

I used a bit of shorthand above since I did not identify enclosing folders. I suggest that if you make a DCP this way, you use temporary folders for all the inputs (and the results of steps 1-3), then create a finalDCP folder which you populate with only the files that will be part of the eventual DCP itself (namely, the 2 mxfs and the 4 XML files that come from step 4).

Step 5: Get the DCP onto a Hard Drive
Tools: regular linux shell

I need to get the specific instructions from Josiah, but basically we formatted a UDF disk solely for the purpose of holding the DCP (partition type 0x83 if I remember correctly). Then I copied over the 6 files that emerged from step 4 right to the root of the new disk. And it's done!

Some quick notes:
  • It is important that you check your XML files to make sure the file paths don't contain any incorrect information: if you aren't careful during step 4, your file paths in the XML may be incorrect! Here's what one of my entries looks like in my final ASSETMAP.xml file as an example: file:///tower37_complete3.video.mxf
  • I don't know what happens if your audio and video durations are different, so I was careful to make sure mine were not. Check them in the CPL (the tag is ).
  • Work with a small movie file for starters, a minute or less, until you get the steps ironed out. Then move to your full film.
I hope this is useful for some of you! If you see any mistakes above, or have suggestions to improve or generalize this pipeline, please let me know.

Monday, February 8, 2010

Making a DCP, post 4

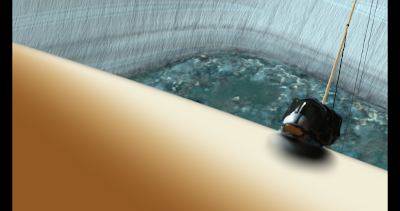
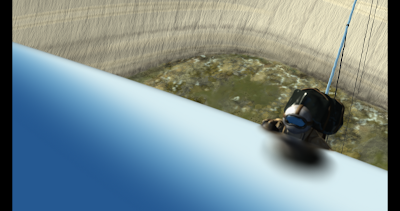
Today I got to watch my latest DCP of The Incident at Tower 37 in its entirety at the theater! 5.1 surround! Crisp and clear picture! The only problem is, it looked like this:


instead of like this:


You just can't have a movie about water where all the water is orange/brown.

So what the heck went wrong?

My current image transformation pipeline is as follows:

QuickTime movie -> PNG files (by way of mplayer)
PNG files -> 12 bit per pixel, color corrected TIFF files (by way of Imagemagick's convert)
TIFF files -> JPEG-2000 files (by way of image_to_j2k, courtesy of openjpeg)

Step one of figuring out this problem: isolate the place where it appears. Luckily, my test from last week looked great, so I have an example of a working set of images to compare with the broken set. As it turns out, my original PNG files are messed up. I can't believe it. I generated over 15,000 PNG files and never actually looked at one of them to confirm that they were right. Rookie move.

The good news? The rest of the pipeline worked great 'cause my bad-looking PNGs (with the brown water) made it all the way into bad-looking JPEG-2000s on the theater screen. Half full, baby!

So let's dig into the PNG making process. It hasn't changed since I made the working test. In other words, my mplayer line is the exact same as the mplayer line I used for the test. So the problem is likely further upstream.

What did change? The source material. The excerpt I tested on last week was a QuickTime movie I made by trimming a final version of the film using QuickTime Pro on a Mac. I trimmed it, then saved it out, flat. Aha. This could be the problem. The QuickTime file I used for the full version had a number of video tracks on it (since I added color bars within QT Pro). Perhaps mplayer didn't know which stream to use, or it somehow misinterpreted the stream itself?

Oh now I have fallen into the rabbit hole. I get different results from mplayer's PNG exporter based on what frame I start with, on what kind of PNG compression I set, and more! It appears to be completely unreliable, at least with my multi-layered QuickTime source file. I'm going to take a suggestion I was given online and check out ffmpeg as an option to create the PNGs, and I'm also going to be cleaner from the outset and make a flat QT source movie with only one video channel.

More to come. Having to export and re-convert all these images again is going to force me to finally distribute this process to our cluster. I can't stand having days pass between tests!

Tuesday, February 2, 2010

Making a DCP, post 3

Victory! The smallest taste, but a good one.

After last week's close-but-no-cigar attempt, I realized I missed a critical last step in my DCP-making script. I had somehow spaced on creating the ASSETMAP and VOLINDEX XML files. Once I caught this, I rolled out a new DCP and brought it to the theater today. Plugged it in, and was pleased that the ingest feature recognized my disk. Instead of the properly-formatted DCP name, however, I saw a UUID in the ingest window. So there are still some kinks to work out.

Aside for the geeky: the UUID that appeared in the ingest window was the UUID of the packing list. I think there's an XML annotation tag or something similar I could have used in that pkl that would have made a better name appear in the ingest window.

Once we ingested the DCP, the next problem was that the CineLister elements window which lists all the DCPs didn't show ours. A reboot made it appear (my theory was that relaunching the program would re-scan the assets folder -- never got to test that theory but the reboot worked).

Aside: the list was sorted by the ContentKind tag, as in, feature, trailer, test, and so on. This is set in the Composition Playlist (CPL) file like so: test.

At this point my pulse quickened. Dave helped build a new playlist with the proper magic incantations to first show black then configure the projector to 2K flat, and we ran it. Though there were scaling issues (he said the projector was at 1k instead of 2k and that it was an easy fix), there was Leed, big as hell, climbing up the side of the tower from u2_01. That's the same shot that opens the online teaser. Heck, I'll embed it again. Too many posts without color recently.


A word on color: the color looked beautiful. I need a longer exposure to it before I say for sure, but thanks to Pavel and Wolfgang for the color transformation matrix they shared on the RedUser forum about DCPs. So far, it's worked great.

So this week I'm going to try and roll out a complete DCP, with 5.1 audio. I'll see if I can work out the kinks in the naming issues, but with luck I'll have more to report next week from the theater!

Tuesday, January 26, 2010

Making a DCP, post 2

I was knocking at the door of digital cinema today, but sadly I was not let in.

With gracious assistance from Dave and Dave at our local digitally-enabled theater, and ongoing Linux help from Josiah at Hampshire, I was actually able to plug a properly-formatted USB hard drive into a Doremi DCP-2000. But I clearly don't know enough about making proper Packing Lists because the ingest function on the DCP-2000 did not detect/recognize any of my files. Time to go back to the spec and the forums and see what I missed about those critical packaging steps (If you want to know more about packing lists and other DCP components, you can find the Digital Cinema System Specification at the Digital Cinema Initiatives website).

Curiously, I felt like I was hacking for the first time in years. Sitting in the dark projection area of the theater, we were studying DCPs that were shipped to the theater on hard drives to try and ascertain how they were different from the ones I had made. Even though we didn't figure it out, it was fun to tweak the package and try the disk over and over again while flickering light from the films illuminated our work. I kind of felt like I was in a sub. It was a long, narrow, enclosed space. The low-frequency drone of the many fans and the many spinning 35mm projectors drowned every other noise out. And just through the little window next to the digital projector, you could see the world of Pandora in its kind-of-like-the-bottom-of-the-ocean glory.

Saturday, January 23, 2010

Making a DCP, post 1

The next phase in Tower 37's exciting life is its conversion into a Digital Cinema Package (DCP). For those who don't know, DCPs are the distribution formats for digital cinema. You can think of them as the replacements of 35mm prints. Those fancy digital projectors showing all sorts of movies at the multiplexes these days take DCPs as input. The DCPs are shipped on hard drives which can be easily plugged into the projectors for complete digital delivery.

Of course I already have Tower 37 as a lossless HD QuickTime file, complete with 5.1 surround sound. You'd think (hope?) that going from one digital format to another would be as easy as, say, converting AIFF audio files to mp3 (aka "ripping" music tracks). But guess what? It's only easy when someone has written, compiled, tested, and released software for doing so. Although I have known this as long as I've worked on computers, it's easy to forget since I rarely encounter a media file these days that I cannot convert perfectly with one of many free software packages.

There are some commercial DCP-makers out there (easyDCP and Wraptor are two), but they are fairly expensive. And, damn it, if we're really just talking about some fancy conversions to a non-proprietary format, there should be something free and available for everyone to use. So yes, I've grown attached to finding an Open Source solution.

Big props so far to the people behind asdcplib and OpenCinemaTools, and the users on the Red user forums who have published software and instructions that they have used/created while traversing this bumpy path. But it's all still so underdeveloped that I've had to recompile stuff locally, make fixes in build scripts, and code my own little process to encode a brief excerpt of Tower 37 into a DCP. I'm hoping to see the test on Tuesday at a local theater, and then to try it out on the whole film if all looks good.

I promise to post a thorough guide if we succeed!